Procedure
· 1. To enter the transaction, type PP01 in the Command field located on the Standard Toolbar, or use the SAP Easy Menu: Logistics à Customer Service à Service Processing à.Environment à Organization à Expert Mode à PP01 General
2. The following icons are used during navigation of transaction PP01:
·
![]() This
icon switches the screen from Change mode to Display mode.
This
icon switches the screen from Change mode to Display mode.
·
![]() This
icon is used for the creation of an object. An object should not be created
from scratch using this transaction. When using the create icon here, you
should be creating a new attribute as of a point in time. This will delimit
the previous attribute and create a historical record.
This
icon is used for the creation of an object. An object should not be created
from scratch using this transaction. When using the create icon here, you
should be creating a new attribute as of a point in time. This will delimit
the previous attribute and create a historical record.
·
![]() This
icon is used to change the infotype of the related object.
This
icon is used to change the infotype of the related object.
·
![]() This
icon is used to display the infotype of the related object
This
icon is used to display the infotype of the related object
·
![]() This
icon is used to copy a specific infotype for an object. It copies only the
infotype highlighted.
This
icon is used to copy a specific infotype for an object. It copies only the
infotype highlighted.
·
![]() This
icon is used to delimit an infotype of an object.
This
icon is used to delimit an infotype of an object.
·
![]() This
icon is used to delete a specific infotype for an object. Do not use
this function until you have consulted with the central IRIS support team.
This
icon is used to delete a specific infotype for an object. Do not use
this function until you have consulted with the central IRIS support team.
·
![]() This
icon is used to display all the historical records for a specific infotype of
the selected object. A screen will be presented that lists the rows of records
recorded for the infotype.
This
icon is used to display all the historical records for a specific infotype of
the selected object. A screen will be presented that lists the rows of records
recorded for the infotype.
·
![]() This
icon activates the object. This functionality will not be used in Phase I of
the IRIS implementation.
This
icon activates the object. This functionality will not be used in Phase I of
the IRIS implementation.
·
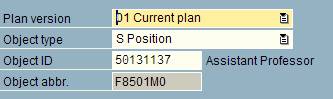 This section
of the screen is the selection area. Plan version will always be Current
plan. It is very important to select the appropriate Object type (job,
position, or organizational unit). Once the object type is selected, search
for the specific object (job, position, organizational unit) using the drop
down icon in the Object ID field.
This section
of the screen is the selection area. Plan version will always be Current
plan. It is very important to select the appropriate Object type (job,
position, or organizational unit). Once the object type is selected, search
for the specific object (job, position, organizational unit) using the drop
down icon in the Object ID field.
·
 This
section determines the dates of selection for view of the object and the
defining infotypes. For example - if you tried to view the history of the
infotypes (
This
section determines the dates of selection for view of the object and the
defining infotypes. For example - if you tried to view the history of the
infotypes ( ![]() ) with the dates
above, you would only see valid records from 10/10/05 forward. If information
existed prior to that, you would need to change the start date or select the
) with the dates
above, you would only see valid records from 10/10/05 forward. If information
existed prior to that, you would need to change the start date or select the ![]() to view all records.
to view all records.
·
![]() This icon
is used to attach external documents to the object. For example, you can
attach a descriptive word document or an IRIS note to the object.
This icon
is used to attach external documents to the object. For example, you can
attach a descriptive word document or an IRIS note to the object.
·
 File Menu
paths provide additional functions for object maintenance. Specifically the
options shown above will impact the object as a whole, whereas the delete and
delimit keys referenced above apply only to the selected infotype of the
object.
File Menu
paths provide additional functions for object maintenance. Specifically the
options shown above will impact the object as a whole, whereas the delete and
delimit keys referenced above apply only to the selected infotype of the
object.
·
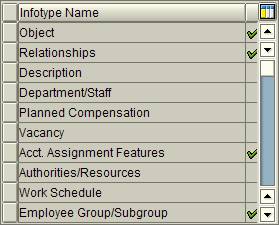 This
section of the screen shows the infotypes associated with the selected object.
The green checks to the right signify that information exists that further
defines the object. This information is stored on the infotype whose text is
displayed to the left (Example - Object).
This
section of the screen shows the infotypes associated with the selected object.
The green checks to the right signify that information exists that further
defines the object. This information is stored on the infotype whose text is
displayed to the left (Example - Object).
3. You have completed this transaction.
You have reviewed the meanings of the icons, fields, and various options available for maintaining objects and their associated infotypes.